Building a Hovercraft!


Following on this page is an example procedure for building a hovercraft.

It documents my build of a Universal Hovercraft UH 12T2

I am currently working on a UH 17T. Pictures of that build are here.

The text below basically follows the UH building literature plus my observations from during the build and some recommendations.

Plans for this and other hovercraft are available from
Universal Hovercraft
1204 3rd St. Box 281
Cordova, IL 61242


Lets Get Started.

(Click on any Picture for a larger version.)

Think about what size of hovercraft you want.

How many people?

Where are you going to fly it mostly: Lake, River, Field, Ice ?

How mechanically apt are you?

How much time to build.

I decided on 2 people, the river and a 2 engine craft. Here's a page from the UH catalog on the chosen UH12T2.

catalog page

Now order the Plans. Be sure to get the full size rib drawing. (It's worth it.)

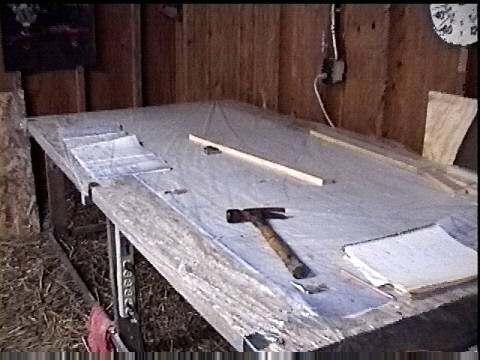
Until they arrive go ahead and clean out your workspace. You'll need at least a car and a half size space. I used half a 2 car garage that was deep enough to hold the hovercraft and a workbench. You'll need a workbench, if you don't have one, build one. I found a 4x8 sheet of plywood and some 2x4's make a table big enough to build all the ribs. Also if you don't have the basic woodworking tools, buy or borrow them. They will make the job easier with better results. The more tools the better but you can build it with just the basics. I would recommend these basic tools to get started: drill, jig saw, tape measure, t square, clamps and a router, table saw or sliding miter saw.

When the plans arrive, read them thoroughly. UH's Construction and operation booklet is good reading, several times. Decide which engines and size of props.

When you're ready, proceed to the local lumberyard and buy the lumber for the ribs. Take your time and look the lumber over well, most common lumber is crooked, warped and full of knots.

Lay the full size rib drawing on the workbench, cover with a thin sheet of plastic.

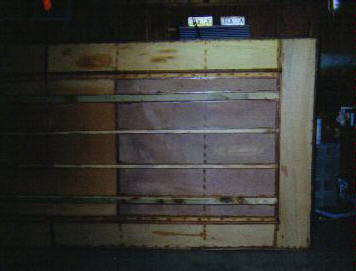
Time to make the ribs stage 1. Lay them out onto the rib sheet and do one joint at a time. Marking all the cuts at once doesn't work, if the first cut angle is a little off then the next joint angle is wrong. I lay out the bottom board, lay on top one of the side boards, mark and cut . Then lay on the next board, line it up with the plan, mark and cut again.  On this 12t2 i used a router to remove 1/2 the board for the splice joint. On the 17t I'm currently building I'm using a sliding miter saw, its much easier, I think. I like to cut all but the bottom  board an inch or two longer than needed, then trim the excess later with a router and trim bit. Once the joints are all cut, go ahead and glue. I used the Weldwood Plastic resin glue, it is very strong, waterproof and easy to mix and use. If you like epoxy go for it. One thing though, go ahead and buy 1/2 gal or gallon of epoxy, you will use alot of it later. Epoxies come in 2 different types, the polyester type will not bond to styrofoam which you'll be doing later, don't buy this type if you're buying the larger quantity of epoxy. On the other hand the polyester type epoxy resin works O.K. for wood to wood joints and is cheaper to use when sealing the bottom skin from inside (more on this later). I used a gallon of West Systems epoxy and 206 slow hardener, it worked well. A note of interest is that many glues are temperature sensitive, if you're building in the winter be sure to check the glue instructions. Try to get your joints good, but don't spend and inordinate amount of time. Small gaps can be filled with glue which is as strong as the wood. Below is a picture of Rib #4.

Rib 4

Once Stage 1 of 3 or all the ribs is completed its time for the overlap pieces. Take a piece of 1/8" plywood and cut a piece to match the joint, sand joint flat, and glue to both sides. Use some more nails or staples, but don't put the nails where the notch will be cut. Check the plans thoroughly. Clamp and let them sit until dry.

Now Stage 2 on the ribs. Sand flat and square all rib outer edges where applicable.

And Stage 3 cutting the notches. drain holes and extra bracing. I used a jigsaw the first time, I'm trying a 3/4 inch mortising bit on a drill press for the 17t.  Don't just cut all the notches at 90 degrees, some of the stringers may meet the rib at an angle.  Another thing to think about now are the extra braces for the area you'll be stepping on when getting in and out. You can do this later but consider how your going to accomplish this, you might want to cut few notches now while it easier to do so.

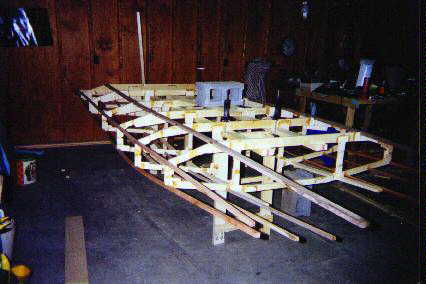
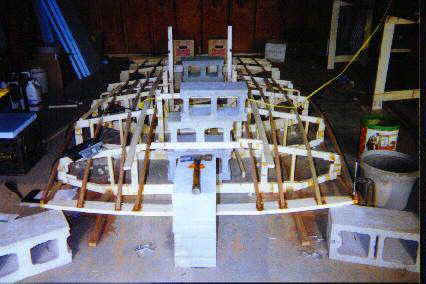
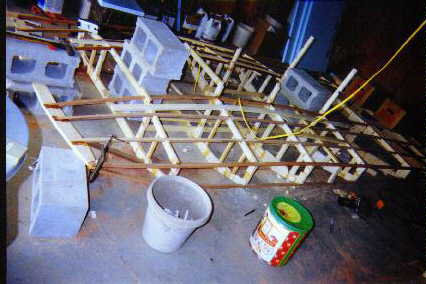
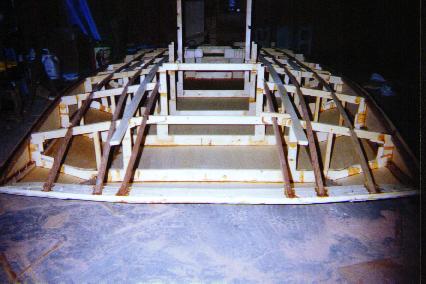
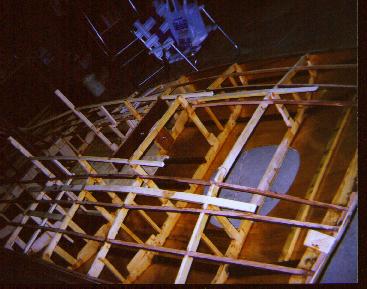
Now to make it look more like a hovercraft. It's time to put the stringers on the ribs. Try to find a long boards with virtually no knots or very small tight ones. I got lucky with several 16 ft. 1x6 pieces of redwood from a dusty loft of the lumberyard. They were completely free of knots. He charged me more than pine but not too much. If you get a good deal on good lumber, buy it. So much of the common lumber is crap, it makes it very hard to use strong boards. Obviously the better the lumber the stronger the hull. I didn't have a table saw for this project but I'm trying one now to rip some 1x6's. For this project a friend ripped all my stringers at 3/4" x 3/4" and I hauled them home tied to the side of the car:)

When you test fit the stringer in the ribs you'll see that the corner and bottom stringer extend past the angle of the rib. The plans show the angle stringer jointIf you're good with a table saw you might be able to cut this angle??? , I may try this next time, on this build I cut the stringers square then used a belt sander to make the angle.

Double check all your rib spacing and use a level to assure ribs are vertical. I marked the bottom stringer for front of each rib and set each rib in place. I did not incorporate Rib 1 into the hull yet, I just let the stringers stick out from rib 2. Later I marked the angle cut and sanded then nailed and glued the stringers to rib 1. You might want to do it different by test fitting the stringers and mark the angles on the stringers mating rib 1, then remove the stringers and cut.

Nail or staple as well as glue the stringers to the ribs

After connecting the ribs and stringers, its time to sand all the joints and add rib 1. Some of the pictures below show the hull in the upside down position as I was sanding the bottom.

hull1 hull2

Its now taking up alot more space in your work area. As you can see in some of the pictures, I used some 2x4's to create a jig that allowed me to set the hull upside down. There is alot of sanding to do, but it's worth the time to get good flat true surfaces.

Ok now the hull structure is together. Its now time to think about the overall project. Are there any assemblies you will not be able to get to easily after skinning the bottom? On this 12T2 there wasn't. Consider things like steering system, electrical cable holders, jug flotation holders, motor mounts bolts, drain holes, prop guard,

Once you're happy with the rib/stringer joints and the sanding its time to cover the sides then bottom. Cut your plywood on the big side, you can always trim and sand off the excess. Be sure to use plenty of glue and nails or staples. The skin should fit tight against the ribs and stringers. Put another nail in wherever you feel movement of the skin against the rib. Now more sanding after each piece layed on, a electric or pneumatic sander is a good investment. 

Go ahead and do the bottom external stringers next, attach them to the ribs only. After gluing and attachment, turn the hull back right side up, then put more nails or screws into the external stringers from the inside as needed.

I used 1/8" mahogany luann which was available locally. Your choices are very limited in thin plywood.

Now turn it back over and cut the bottom hole for the duct then mount the lower tack strips the same way as the external stringers by attaching to the ribs then turning back right side up and putting in more nails from the inside. Also do the upper tack strips. In order to determine the correct size of the bottom duct hole you must have made the decision on the size of fan you will use. I used a 24" 4 blade.

Now use some epoxy to seal the joints. Brush it into all the places the skin meets the ribs or stringers. You don't want water seeping into these small spaces and rotting the wood. Also check to any nails that protrude and grind them down or clip them off flush.

This is a good time to paint or water seal the inside. I just used a clear waterproofing.

Notice the bottom of Rib 2 is still there, I decided to cut it out later. Also notice the small board attached to Rib 1, I used this as a more positive way of attaching a tow hook. There didn't seem to be a lot of support for the angled up front piece so I installed a piece inside for better attachment of the front upper tack strip.

how about a handle or tow hook up front. what about nuts or bolts for the front engine mounts. how are you going to do the steering. take your time and think about everything you will need to put in that frontal area beyond rib 3. It hard to access after you have skinned the top and put the duct in. Are you going to want a front light for operation after dark.

Time to skin the top and do the duct. Before we skin the top, again make sure you have thought about everything that will go into that frontal area and made provisions to get it installed. With the 12T2 I could reach the engine mount holes so I did not need to preinstall nut plates. If you haven't already, sand flat the stringers, ribs and joints.

I cut the plywood and temp fit it with a few nails, then cut the upper duct hole. Then permanently installed the skin. I also decided I would cut the rib out later.

Back to top of Page

Part 2            Part 3